
티스토리 뷰
스프링 부트 프로젝트에 OAuth2를 적용하는 것 자체는 쉽다
그러나 한발 더 나아가 흐름을 이해하고 어떻게 동작하는지 알아보려면 그다지 쉽지 않을 것이다
본 글은 OAuth2에 대한 이해를 도와줄 수는 있으나 친절한 설명이 될 것 같진 않다
스텝 바이 스텝으로 따라오게 만들 정도의 글 솜씨가 아니라 그렇다
내가 이해한 바를 바탕으로 어떻게 적용했는지를 보여줄 것이다
OAuth2 입문자에겐 매우 불친절한 자료가 될 예정이고 예제를 따라 적용을 해본 사람에겐 도움이 될 수 있을 것이다
글 하단에 참고 블로그를 첨부했다, 난 저 자료들 외에도 수 많은 자료들을 참고했는데 제일 잘 정리된 글들만 추렸다
개념 정리는 이해하는게 제일 중요하니 원서보다 한글로 된 자료를 보는 것을 추천한다
영어가 된다면 공식 문서 보는게 제일 좋다
개념 정리 블로그 둘은 내용이 굉장히 방대하지만 반드시 다 숙지하기를 추천한다
개념을 이해하지 않고서는 그대로 갖다 붙이는 타자 연습밖에 되지 않는다
또한 OAuth2 로그인을 확장하는 과정에서 만날 에러를 쉽게 해결할 수 없을 것이다
아무리 구글링 해봐도 저 둘보다 이해하기 쉽고 잘 정돈된 글을 찾기는 힘들다
대부분의 예제 코드는 callicoder의 자료를 바탕으로 한글로 번역되어 만들어져 있어 코드가 비슷비슷하다
엄한 코드 따라치지 말고 원본 보고 따라 치자
SecurityConfig는 다음과 같다
@EnableWebSecurity
@RequiredArgsConstructor
@EnableGlobalMethodSecurity(prePostEnabled = true)
public class SecurityConfig extends WebSecurityConfigurerAdapter {

  private final JwtSecurityConfig jwtSecurityConfig;
  private final CustomOidcUserService customOidcUserService;
  private final CustomOAuth2UserService customOAuth2UserService;
  private final CustomUserDetailsService customUserDetailsService;
  private final ClientRegistrationRepository clientRegistrationRepository;
  private final OAuth2AuthenticationSuccessHandler oAuth2AuthenticationSuccessHandler;
  private final OAuth2AuthenticationFailureHandler oAuth2AuthenticationFailureHandler;
  private final HttpCookieOAuth2AuthorizationRequestRepository httpCookieOAuth2AuthorizationRequestRepository;

  @Bean
  public PasswordEncoder passwordEncoder() {
    return new Argon2PasswordEncoder();
  }

  @Override
  public AuthenticationManager authenticationManagerBean() throws Exception {
    return super.authenticationManagerBean();
  }

  @Override
  public void configure(WebSecurity web) throws Exception {
    web.ignoring()
        .antMatchers(UriConstants.SHOULD_NOT_FILTER_URL_PATTERNS);
  }

  @Override
  protected void configure(AuthenticationManagerBuilder auth) throws Exception {
    auth.userDetailsService(customUserDetailsService)
        .passwordEncoder(passwordEncoder());
  }

  @Override
  protected void configure(HttpSecurity http) throws Exception {
    http
        .csrf().disable()
        .logout().disable()
        .formLogin().disable()
        .httpBasic().disable()
        .sessionManagement()
        .sessionCreationPolicy(SessionCreationPolicy.STATELESS)
        .and()

        .apply(jwtSecurityConfig)
        .and()

        .oauth2Login()
        .loginPage("/login")
        .clientRegistrationRepository(clientRegistrationRepository)
        .authorizationEndpoint()
        .authorizationRequestRepository(httpCookieOAuth2AuthorizationRequestRepository)

        .and()
        .userInfoEndpoint()
        .userService(customOAuth2UserService)
        .oidcUserService(customOidcUserService)

        .and()
        .successHandler(oAuth2AuthenticationSuccessHandler)
        .failureHandler(oAuth2AuthenticationFailureHandler);
  }
}
JWT를 위한 설정으로 csrf, formLogin, httpBasic, session을 다 비활성화하고 jwtSecurityConfig를 추가 적용해놨다
oauth2Login으로 넘어오는 응답을 처리하기 위한 customOAuth2UserService, customOidcUserService가 존재한다
성공과 실패를 처리하기 위한 핸들러를 추가해줬다
SecurityConfig는 단순한 형태로 되어있고 권한은 현재 method 별로 따로 지정해줬다
프로젝트 규모가 커질수록 url 별로 나눠 적용 후에 @PreAuthorize를 이용한 추가 적용을 하는 게 더 나을 것 같다
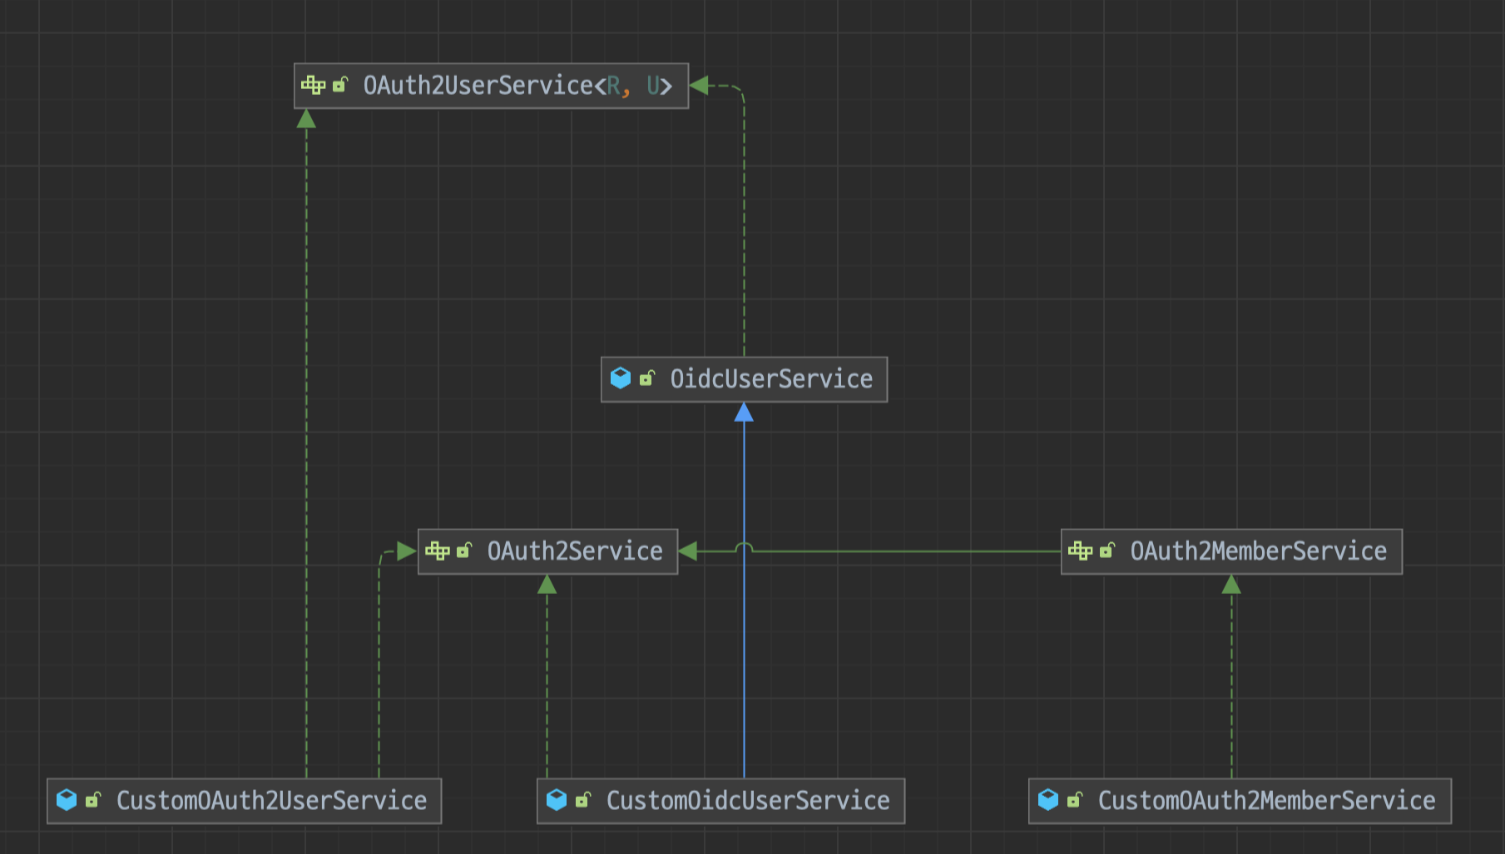
OAuth2 로그인 처리는 위 클래스 다이어그램에 따라 이뤄진다
OAuth2 처리는 CustomOAuth2UserService에서 하는데 OAuth2 통신 과정도 직접 처리할 수 있지만
Spring-Security가 제공하는 기본 구현체인 DefaultOAuth2UserService를 상속해 통신 과정을 위임한다
이미 잘 구성된 클래스를 내버려두고 바퀴를 재발명하는 게 목표가 아니니 위임하고 넘겨도 된다
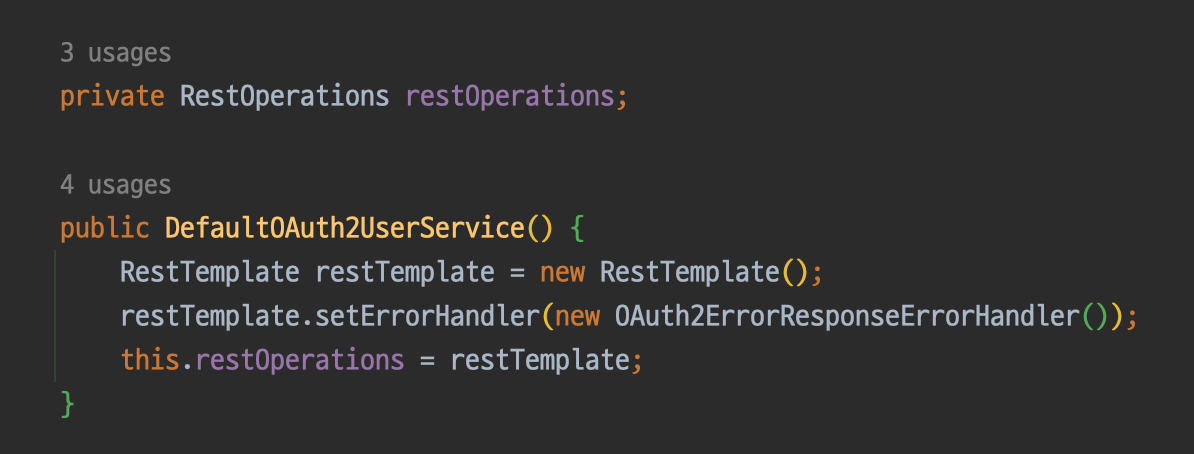
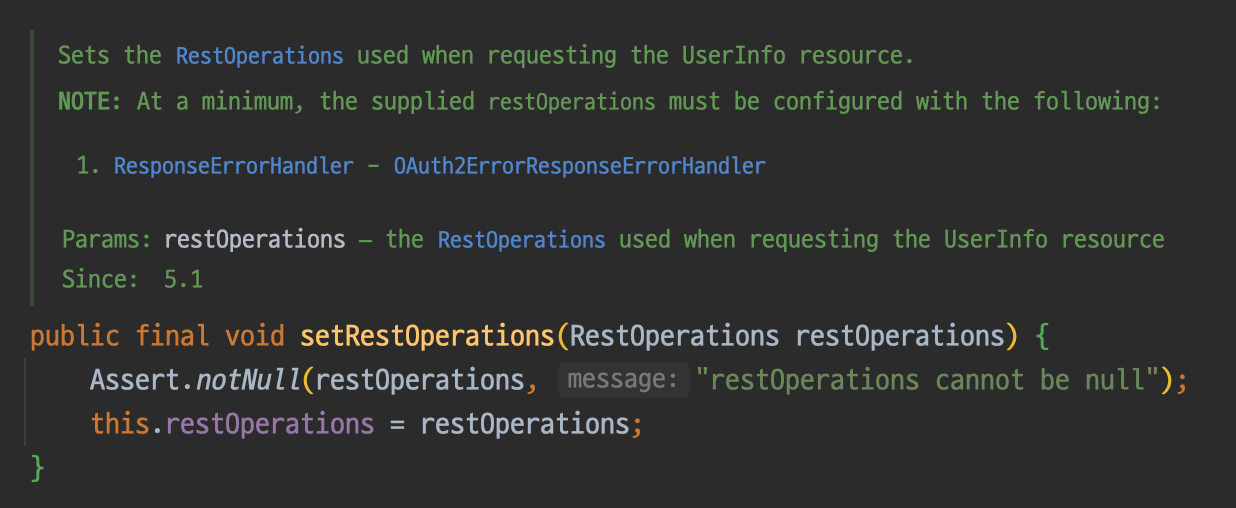
기본 구현체에서는 통신을 위해 RestTemplate을 사용하는데 알고 보니 요놈도 변경이 가능하다
다만 RestOperations로 들어가 있어서 WebClient로 갈아끼우는 건 안 되고 AsyncRestTemplate은 가능하다
OIDC 처리는 CustomOidcUserService에서 이뤄진다
역시 기본 구현체인 OidcUserService를 상속하여 통신 과정을 위임하도록 한다
// OAuth2 처리
@Service
@RequiredArgsConstructor
public class CustomOAuth2UserService extends DefaultOAuth2UserService implements OAuth2Service {

  private final OAuth2MemberService oAuth2MemberService;

  @Override
  @Transactional
  public OAuth2User loadUser(OAuth2UserRequest userRequest) throws OAuth2AuthenticationException {
    OAuth2User oAuth2User = super.loadUser(userRequest);
    return getOAuth2UserPrincipal(userRequest, oAuth2MemberService, oAuth2User);
  }
}

// OIDC 처리
@Service
@RequiredArgsConstructor
public class CustomOidcUserService extends OidcUserService implements OAuth2Service {

  private final OAuth2MemberService oAuth2MemberService;

  @Override
  @Transactional
  public OidcUser loadUser(OidcUserRequest userRequest) throws OAuth2AuthenticationException {
    OidcUser oidcUser = super.loadUser(userRequest);
    return getOAuth2UserPrincipal(userRequest, oAuth2MemberService, oidcUser);
  }
}
두 클래스들이 구현하는 OAuth2Service는 무엇일까?
커스텀 인터페이스로 두 클래스들의 공통 로직을 묶어주기 위한 인터페이스다
템플릿 메서드 패턴의 모양을 가졌는데 이를 노리고 만들었다기보단 공통적인 것을 빼다 보니 이렇게 됐다
OAuth2 로그인으로 받아오는 정보를 OAuth2Attributes.of() 메서드를 호출해 담아준다
public interface OAuth2Service {

  default OAuth2UserPrincipal getOAuth2UserPrincipal(OAuth2UserRequest userRequest, OAuth2MemberService service, OAuth2User oAuth2User) {
    OAuth2Token oAuth2Token = userRequest.getAccessToken();
    String registrationId = userRequest.getClientRegistration().getRegistrationId();
    OAuth2Attributes oAuth2Attributes = OAuth2Attributes.of(registrationId, oAuth2User.getAttributes());

    Member member = service.getMember(registrationId, oAuth2Attributes);
    return OAuth2UserPrincipal.of(member, oAuth2User, oAuth2Token);
  }
}
매개변수의 인자로 받아오는 OAuth2MemberService는 받아오는 유저 정보를 DB에 넣어주기 위한 인터페이스다
복잡성이 추가되는 단점이 있지만 인터페이스에서 구현 클래스에 의존하지 않도록 추가적인 인터페이스를 만들어줬다
// 인터페이스
public interface OAuth2MemberService {

  Member getMember(String registrationId, OAuth2Attributes attributes);
}

// 구현체
@Service
@RequiredArgsConstructor
@EntityListeners(value = AuditingEntityListener.class)
public class CustomOAuth2MemberService implements OAuth2MemberService {

  private final MemberRepository memberRepository;

  public Member getMember(String registrationId, OAuth2Attributes attributes) {
    Optional<Member> probableMember = memberRepository.findByEmail(attributes.getEmail());
    probableMember.ifPresent(member -> {
          throwIfInactive(member);
          member.changeLatestAuthProvider(AuthProvider.caseInsensitiveValueOf(registrationId));
        }
    );

    return probableMember.orElseGet(() -> getNewlyRegistered(registrationId, attributes));
  }

  private void throwIfInactive(Member member) {
    if (Status.INACTIVE.equals(member.getStatus()))
      throw new IllegalStateException(ExceptionMessages.Member.ALREADY_LEFT);
  }

  private Member getNewlyRegistered(String registrationId, OAuth2Attributes oAuth2Attributes) {
    Member member = oAuth2Attributes.toMember(registrationId);
    return memberRepository.save(member);
  }
}
코드 레벨에선 다를지 몰라도 흐름 자체는 callicoder 글의 예제와 동일하다
DB에 존재하는 회원 정보를 가져오는데 ifPresent()로 있는 경우에만 가져오도록 하고
존재하는 경우라도 회원의 상태를 검사하는 throwIfInactive()에서 비활성화된 회원의 경우는 예외를 터트리게 했다
존재하지 않는 경우 orElseGet()을 통해 getNewlyRegistered()를 호출한다
OAuth2 로그인으로 받아온 유저 정보를 OAuth2Attributes에 넣어두고 프로젝트에서 사용하는 Member로 변환시킨다
찔끔 최적화로 OAuth2Attributes를 Member로 변환 시킬 때 인스턴스 변수인 member에 할당 후 반환하는데
toMember를 여러번 호출하면 그 때마다 아래의 작업을 처리하기 때문이다
1. Argon2PasswordEncoder 생성
2. 랜덤 문자열 생성
3. 랜덤 문자열 Argon2PasswordEncoder로 암호화
4. AuthProvider 생성 (얘는 enum이라 추가적 비용은 없다만 코드가 실행되는 비용은 존재한다)
5. Member 생성
인스턴스 변수로 member를 가지고 있다면 중복 호출에도 member를 그대로 반환하면 된다
Argon2PasswordEncoder로 암호화하는 과정에서 발생할 수 있는 오버헤드를 줄이기 위함이다
@Getter
public class OAuth2Attributes {

  private static final String GOOGLE_REGISTRATION_ID = "google";
  private static final Map<String, Function<Map<String, Object>, OAuth2Attributes>> ATTRIBUTES_BY_PROVIDER =
      new HashMap<String, Function<Map<String, Object>, OAuth2Attributes>>() {{
        put(GOOGLE_REGISTRATION_ID, OAuth2Attributes::ofGoogleAttributes);
      }};

  private final String email;
  private final String nickname;
  private final Map<String, Object> attributes;

  private Member member;

  @Builder
  private OAuth2Attributes(String email, String nickname, Map<String, Object> attributes) {
    this.email = email;
    this.nickname = nickname;
    this.attributes = attributes;
  }

  public static OAuth2Attributes of(String registrationId, Map<String, Object> attributes) {
    return ATTRIBUTES_BY_PROVIDER.get(registrationId.toLowerCase()).apply(attributes);
  }

  private static OAuth2Attributes ofGoogleAttributes(Map<String, Object> attributes) {
    return OAuth2Attributes.builder()
        .email((String) attributes.get("email"))
        .nickname((String) attributes.get("name"))
        .attributes(attributes)
        .build();
  }

  public Member toMember(String registrationId) {
    if (member != null)
      return member;

    Argon2PasswordEncoder passwordEncoder = new Argon2PasswordEncoder();
    String defaultRandomPassword = RandomStringUtils.randomAlphanumeric(10);
    String encodedRandomPassword = passwordEncoder.encode(defaultRandomPassword);
    AuthProvider initialAuthProvider = AuthProvider.caseInsensitiveValueOf(registrationId);

    member = Member.builder()
        .email(email)
        .nickname(nickname)
        .password(encodedRandomPassword)
        .initialAuthProvider(initialAuthProvider)
        .build();
    return member;
  }
}
예전에 작성했던 switch-case문을 리팩토링 하는 결과물로 ATTRIBUTES_BY_PROVIDER가 나왔다
OAuth2Attributes.of() 호출 시에 내부적으로 registrationId인 벤더들의 이름에 따라 호출되는 메서드가 정해진다
이를 더 깔끔하게 정리하려면 enum으로 만들어 관리하는 방법이 있다만 나도 아직 적용을 하지 못 했다
OAuth2Attributes를 엔티티인 Member로 변환하는 toMember() 메서드에서는 랜덤 문자열로
Argon2PasswordEncoder를 사용해 인코딩 후 넣어준다
DB에서 회원의 비밀번호를 암호화한 상태로 보관하기 위해 추가 처리를 해주는 것이다
Argon2PasswordEncoder의 설정을 바꾸지 않고 기본으로 사용한다면 인코딩한 결과 값 길이가 96이 나오므로
더욱 높은 완성도를 유지하려면 DB 자체에서 비밀번호의 길이 제한을 걸어두면 된다
비밀번호 암호화에 Argon2PasswordEncoder를 사용하는 이유는 단순히 멋이 아니다
물론 Bcrypt를 사용하는 것보다 멋있기도 하다 🤣
어떤 정보를 받아오느냐는 scope로 정할 수 있는데 나는 회원 사진까지 관리하지는 않아 profile, email만 가져오고 있다
따라서 프로젝트의 목적에 따라 더 많은 정보를 땡겨올 수도 있고 단순히 email만 땡겨올 수도 있다
본 프로젝트 말고 진행하는 사이드 프로젝트에서는 image도 가져오고 있는데 profile에서 뿌려주기 때문에 scope 변경 없이
OAuth2Attributes에 필드만 추가해서 추가로 받기만 하면 된다
개념 정리
- https://deeplify.dev/back-end/spring/oauth2-social-login
- https://velog.io/@jakeseo_me/Oauth-2.0%EA%B3%BC-OpenID-Connect-%ED%94%84%EB%A1%9C%ED%86%A0%EC%BD%9C-%EC%A0%95%EB%A6%AC
예제
- https://www.callicoder.com/spring-boot-security-oauth2-social-login-part-1/
- https://www.callicoder.com/spring-boot-security-oauth2-social-login-part-2/
깃허브 레포
GitHub - Ryu-JeongMoon/oauth2-post-service
Contribute to Ryu-JeongMoon/oauth2-post-service development by creating an account on GitHub.
github.com
'Project' 카테고리의 다른 글
| [OAuth2] Spring-Security OAuth2 구글 연동 - 3 (0) | 2022.04.25 |
|---|---|
| [OAuth2] Spring-Security OAuth2 구글 연동 - 1 (0) | 2022.04.24 |
| [notice-service] 게시글 REST API 구현하기 (0) | 2021.11.20 |
| board-api (0) | 2021.10.25 |
| product-api (0) | 2021.10.25 |